What to Do If You Fall Through the Ice
Falling through the ice is one of those nightmares that can quickly become a terrifying reality for anyone venturing out onto North Dakota's frozen lakes and rivers. The sudden plunge into frigid water can trigger panic, make simple movements impossible, and quickly lead to life-threatening hypothermia. This guide isn't here to scare you, but to empower you with the knowledge and actionable steps you need to take if you ever find yourself in this incredibly dangerous situation, helping you understand how to react, self-rescue, and survive.
The Immediate Shock and Initial Actions
The moment you break through the ice, your body is going to react intensely. It's a natural, primal response, but understanding it can help you regain control and focus on survival. The cold shock response is real, and it can be deadly if you don't manage it.
Don't Panic: Your Brain is Your First Tool
When you hit that icy water, the first thing your body does is gasp for air involuntarily. This can be incredibly dangerous if your head goes under, as you might inhale water. Your heart rate will skyrocket, and you'll feel an immediate, excruciating cold that almost takes your breath away. This is the moment to fight every instinct to thrash wildly. Take a deep breath if you can, and try to control your breathing. Tell yourself, "I know what to do." Your brain, not your muscles, needs to be in charge right now. Focus on keeping your head above water and getting your breathing under control. Remember, you have a few minutes of "cold shock" before your muscles start to lose their coordination and strength. Use those precious moments wisely.
Think about your immediate surroundings. Where did you come from? Is there a visible edge of thicker ice nearby? Are there any objects floating that you can grab onto? Even a slight advantage can make a huge difference. Don't waste energy screaming immediately if no one is close enough to hear you, especially if it interferes with your breathing. Conserve your strength and focus on the steps to get yourself out.
Calling for Help Even If You Can't Get Out
Once your breathing is somewhat under control, it's time to think about alerting others. If you have a whistle, blow it loudly and repeatedly. If you have a phone in a waterproof case, try to call for help. Modern smartphones often have emergency features that can be activated even with wet hands or if you're partially submerged. The key is to make yourself as visible and audible as possible.
Even if you don't see anyone right away, continue to make noise periodically. Someone might be further away than you think, or heading in your direction. If you're with a group, make sure they know exactly where you are and what has happened. They can then organize a rescue or call 911 immediately. Remember, every second counts when dealing with exposure to cold water, so quick communication is paramount.
The Self-Rescue Sequence: Getting Out of the Water
This is the most critical phase. Getting yourself out of the water and back onto stable ice is a challenge, but it's absolutely achievable with the right technique and mental resolve.
The "Ice Pick" Maneuver or Clawing Your Way Out
This is where dedicated safety gear truly shines. If you've been smart and carried ice safety picks, now is their moment to literally save your life. They provide crucial grip on the slick ice edge. Dig them in, one after the other, to give yourself leverage. If you don't have ice picks (and seriously, consider getting some – you can find excellent, affordable options on Amazon), then you'll have to improvise. Use your keys, a screwdriver, or even your bare hands and elbows to try and gain purchase on the ice.
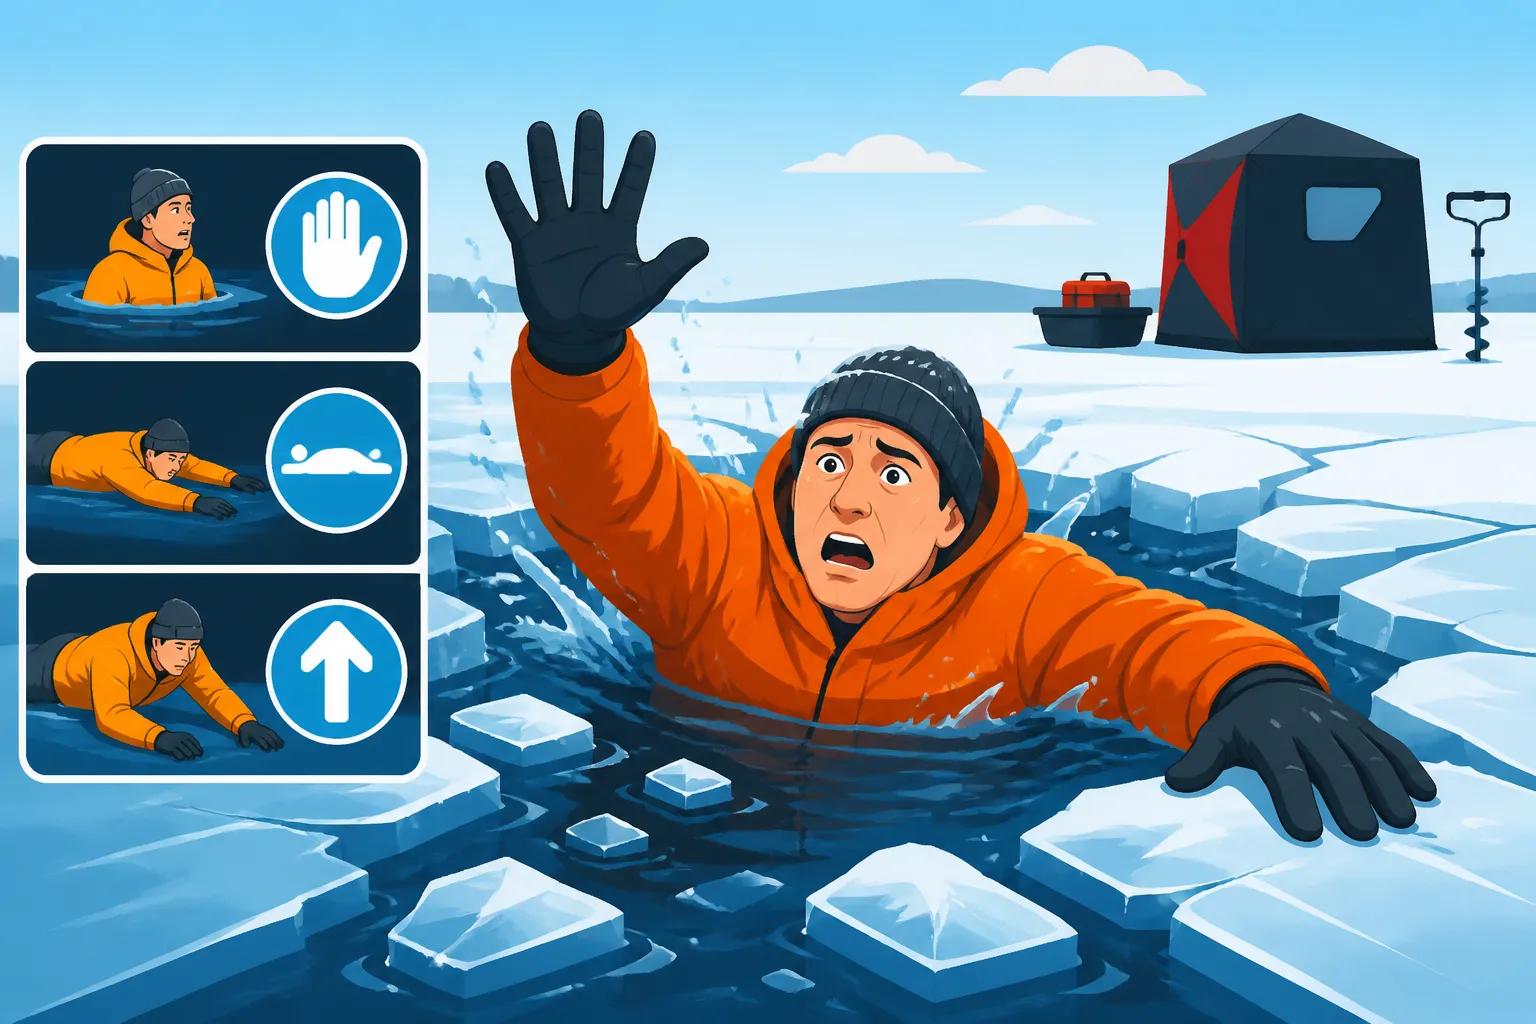
The technique is to face the direction you came from, as that ice is likely more stable. Extend your arms onto the ice and use your picks (or hands) to stab and pull. Kick your feet vigorously behind you, almost like you're swimming. This helps to bring your body into a horizontal position, reducing drag and making it easier to leverage yourself onto the ice. Try to get as much of your upper body onto the ice as possible with each pull. It's a brutal workout, especially in the cold, but consistency is key. This is a moment where those who understand Should You Carry Ice Picks While Ice Fishing? will be eternally grateful for their foresight.
Kicking and Pulling: Spreading Your Weight
Once you've got your arms up and some purchase with your ice picks, the goal is to get your entire body out of the water. Continue kicking your legs, propelling yourself forward. As you pull, try to get your chest onto the ice. Once your chest is on, you can begin to slide your knees onto the ice. Crucially, don't try to stand up immediately. This concentrates your weight in one small area, making it very likely you'll break through again.
Instead, spread your weight out as much as possible. Imagine you're a seal flopping onto the ice. Use your forearms and knees to distribute your weight over a larger area. This reduces the pressure on any single point of the ice, giving you a better chance of staying on top. Keep moving deliberately and calmly. The effort will be immense, and the cold will be gnawing, but focus on the mechanics of getting yourself fully out.
The Roll and Crawl: Once You're Out
Congratulations, you're out of the water! But the danger isn't over yet. The ice around the hole is likely compromised and weak. As mentioned earlier, standing up is a bad idea. Once you've hauled yourself out, immediately roll away from the hole, continuing to spread your weight. Keep rolling or crawling on your stomach, using your arms and legs to propel yourself.
Move in the direction you came from, as that ice should be thicker. Continue this low-impact, weight-distributing movement until you are well away from the break-through point and on unquestionably solid ice. How far is "well away"? A good rule of thumb is at least 30-50 feet, or until you are absolutely certain you are on stable, thick ice, perhaps where you previously checked the ice thickness. This crawling method is essential to prevent a devastating repeat plunge into the freezing water.
Post-Rescue: Surviving the Cold and Getting Warm
Getting out of the water is a huge victory, but you're still in a life-threatening situation. Hypothermia sets in rapidly when your body temperature drops, and wet clothing will accelerate this process.
Shedding Wet Clothes and Staying Insulated
Your priority now is to get dry and warm. If you have a rescue kit or a change of clothes stashed nearby (and you absolutely should if you're venturing onto the ice), get to it immediately. Strip off your wet outer layers. While it might seem counterintuitive to take off clothes in the cold, wet clothing will suck heat from your body much faster than being naked, even for a short time.
If you have a thermal blanket or an emergency bivvy (many affordable options are available on Amazon), deploy it right away. These items are designed to reflect your body heat and provide a barrier against wind and moisture. If you don't have a full change of clothes, at least put on dry insulating layers over your skin. Even partially dry clothes are better than soaking wet ones. Insulated layers like wool or synthetics retain heat better than cotton, even when damp. Consider the advice on What to Wear Ice Fishing in North Dakota for future preparedness.
Signaling for Help and Seeking Shelter
Even if you've self-rescued, you still need to ensure someone knows you're safe and can assist you further, especially if you're alone. Continue to signal for help. Use a whistle, bright flagging tape you might have in your kit, or even wave brightly colored items. If you have a fully charged phone, use it to call for assistance and report your exact location.
Your next immediate concern is finding or creating shelter from the wind. Wind chill dramatically accelerates heat loss. If you have an ice fishing shelter, get into it immediately. Even a basic windbreak can make a difference. If you can't get to your main shelter, consider using a tarp or even positioning yourself behind a snowdrift or a vehicle to block the wind. Every degree of warmth you can retain is vital. Familiarize yourself with options like Best Ice Fishing Shelters for North Dakota for better preparedness.
Recognizing and Treating Hypothermia
Hypothermia is a serious risk after falling through the ice. It occurs when your body loses heat faster than it can produce it, causing your core body temperature to drop. Recognizing the symptoms is crucial for yourself and others.
Symptoms of Hypothermia:
- Mild Hypothermia: Shivering, feeling cold, slurred speech, confusion, clumsiness, apathy, difficulty with fine motor skills.
- Moderate Hypothermia: Intense shivering stops, muscles stiffen, more pronounced confusion and disorientation, irrational behavior (like trying to shed clothes), slowed pulse and breathing.
- Severe Hypothermia: Unconsciousness, no visible shivering, very slow and weak pulse, shallow breathing, dilated pupils, rigid muscles.
What to do:
- For mild cases: Get the person (or yourself) to a warm, dry place. Remove wet clothing and replace with dry, warm layers. Offer warm, sweet drinks (non-alcoholic, non-caffeinated). Have them eat high-calorie snacks. Move gently; avoid sudden movements which can push cold blood to the heart.
- For moderate to severe cases: This is a medical emergency. Call 911 immediately. While waiting for help, gently move the person to a warm, sheltered location. Do not try to rub or vigorously massage the person, as this can be dangerous. Apply warm compresses to the neck, chest, and groin area. If possible, place them in a sleeping bag with another warm person (skin-to-skin contact, if appropriate, can transfer heat). Monitor their breathing and pulse. How Cold It Gets Ice Fishing in North Dakota highlights just how quickly things can go south in our extreme winters.
Prevention: The Best Defense Against Falling Through
While knowing what to do in an emergency is vital, preventing the fall in the first place is always the best strategy. A little caution and preparation can save your life.
Understanding Ice Thickness and Conditions
Never assume ice is safe just because others are on it or because it's winter. Ice conditions can vary wildly, even on the same body of water. Current, springs, pressure ridges, and submerged structures can all create thin spots. Always check the ice thickness regularly as you venture out. A general guideline for clear, solid ice is:
| Activity | Recommended Minimum Ice Thickness |
|---|---|
| Ice fishing (foot travel) | 4 inches |
| Snowmobile / ATV | 5-7 inches |
| Small car / light pickup | 8-12 inches |
| Medium truck | 12-15 inches |
Remember, these are minimums for clear, solid ice. White ice or "snow ice" is only about half as strong. Always err on the side of caution. Learning How Thick Ice Needs to Be for Ice Fishing is your first step in responsible ice safety. Continually checking ice conditions and understanding How to Check Ice Thickness Safely are non-negotiable before and during your trip.
Essential Safety Gear You Must Carry
Preparation isn't just about knowing what to do; it's about having the tools to do it. Think of it as your winter fishing insurance policy.
- Ice Safety Picks: Worn around your neck, these are your absolute best friend if you fall in. They provide grip on slippery ice. As mentioned, you can easily find quality ones on Amazon.
- Floating Throw Rope: A long rope with a flotation device on one end is critical for helping someone else, or for being helped yourself. Keep it easily accessible.
- Personal Flotation Device (PFD) or Flotation Suit: A PFD provides buoyancy and can help you keep your head above water, conserving energy. A full flotation suit offers insulation as well, drastically increasing your survival time.
- Whistle: For signaling for help.
- Waterproof Bag with Dry Clothes: Even a small bag with a dry base layer, socks, and a hat can make a huge difference in warding off hypothermia.
- First-Aid Kit: With emergency blankets and items for minor injuries.
- Charged Cell Phone in a Waterproof Case: For emergencies.
- Spud Bar or Ice Auger: To check ice thickness as you go. Even if you're just walking, carry a spud bar to test the ice in front of you. This is more useful than just drilling a hole for fishing, as discussed in Ice Fishing Auger Techniques.
Buddy System and Communication
Never, ever fish alone on the ice, especially in early or late season. The buddy system is one of the most effective safety measures. If one person goes through, the other can immediately initiate a rescue or call for help.
Beyond the buddy system, make sure someone knows your plans even if they aren't coming with you. Tell a friend or family member:
- Where you're going.
- Who you're going with.
- When you expect to be back.
- Your vehicle description and license plate number.
This way, if you don't check in by a certain time, they know where to start looking. This simple act of communication can be the difference between a swift rescue and a tragic outcome. Always consider Early Ice Fishing Safety Tips and Late Ice Fishing Safety Tips before heading out onto the hard water.
Disclaimer
This article is for general informational purposes only and does not constitute professional advice. Laws, prices and regulations vary by location and change over time. Consult a qualified professional for guidance on your specific situation.