How to Clean a Channel Catfish
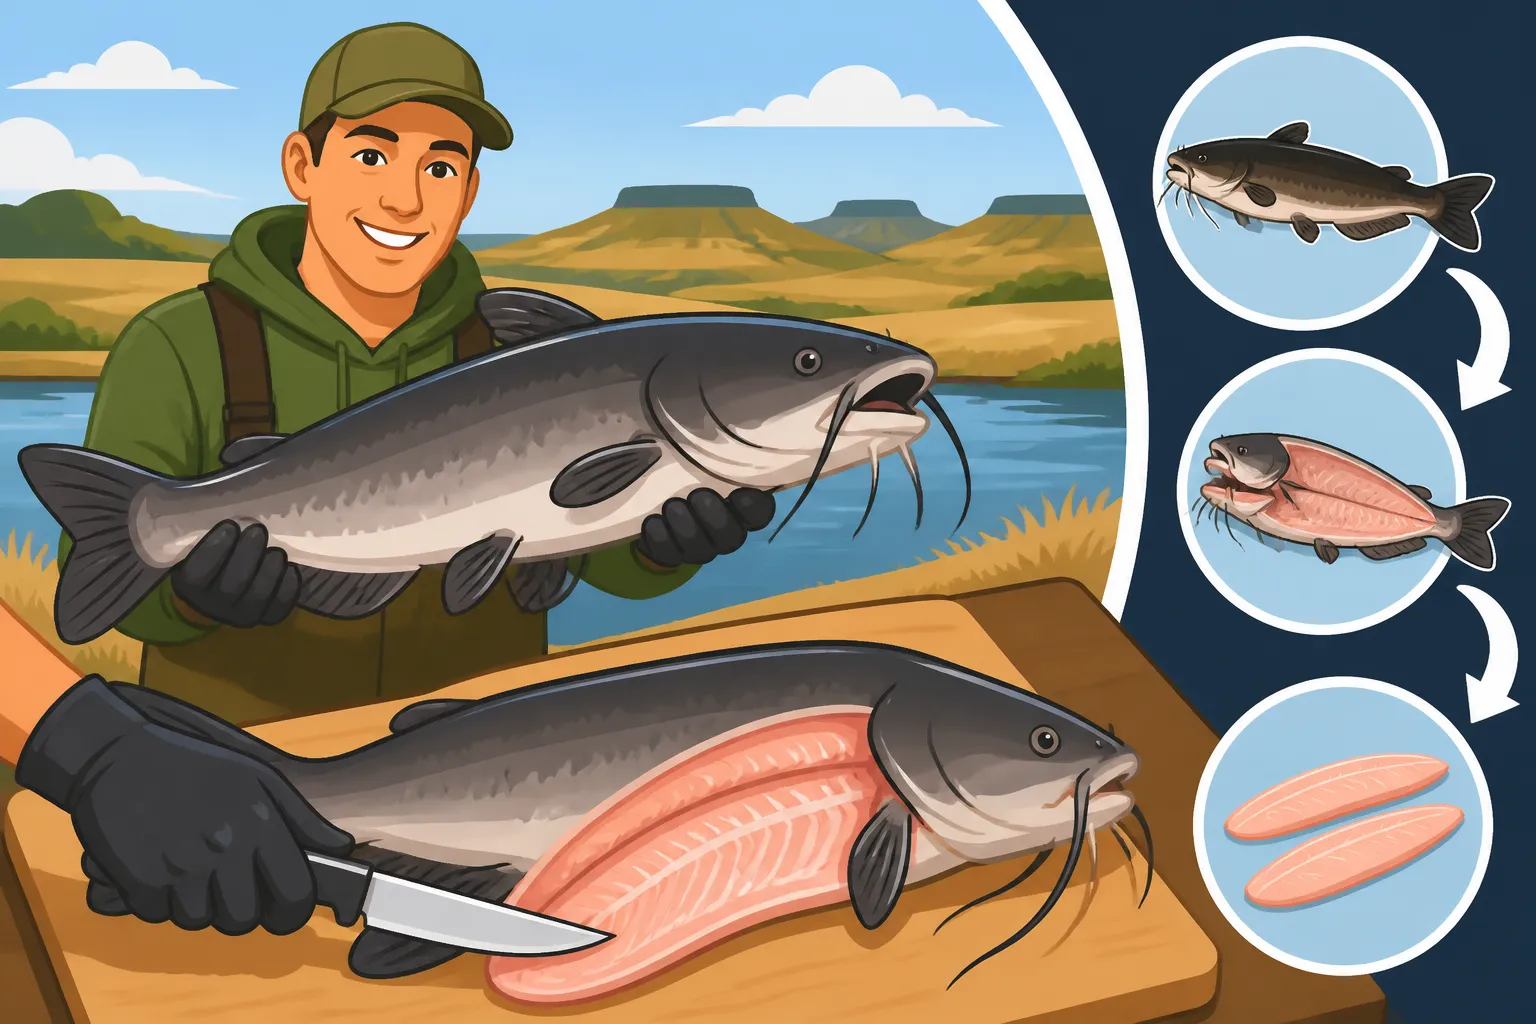
Catching a feisty channel catfish in the Red River or one of North Dakota's other fantastic waterways is an absolute thrill, but sometimes the thought of cleaning that slippery, whiskered beauty can feel a little daunting. Trust me, I've been there, wrestling with a fish that just doesn't want to cooperate. This guide is here to walk you through the process, step by step, so you can confidently transform your catch into delicious, boneless fillets ready for the pan or fryer.
Why Cleaning Channel Catfish Can Be a Bit Different (and Worth It!)
Channel catfish are incredible game fish, known for their strong fight and even stronger table fare. However, they're not like your typical walleye or perch when it comes to cleaning. Their tough, scale-less skin and sometimes bony structure can be a challenge if you don't know the tricks of the trade. But once you master the technique, you'll find it's incredibly rewarding.
Understanding Their Unique Anatomy for Easier Cleaning
Unlike most other game fish that have easily removed scales, channel catfish have a smooth, leathery skin that's quite thick and firmly attached. This means scaling isn't an option; you'll need to skin them. Their skeleton, particularly around the head and spine, can also be quite robust. Knowing this helps you approach the cleaning process with the right strategy. You're not looking to scale, you're looking to skin and then fillet or dress the fish. This distinct characteristic is part of what makes them such resilient survivors in our North Dakota waters and gives them their unique flavor. They're built tough, and so is their outer layer!
The Reward: Delicious, Boneless Fillets
Honestly, there's nothing quite like a freshly caught, perfectly cleaned channel catfish fillet. The meat is firm, flaky, and has a mild, sweet flavor that many compare to a cross between a perch and a cod. It holds up wonderfully to frying, grilling, or baking. By taking the time to properly clean your catch, you're ensuring that you get the most out of your fishing experience, transforming a wild fish into a truly delectable meal. Many anglers consider catfish to be one of the best eating fish in North Dakota, and for good reason! The effort put into cleaning them truly pays off at the dinner table. If you're wondering Are North Dakota Channel Catfish Safe to Eat?, generally, yes, they are, but it's always good to check local advisories.
Essential Gear for Cleaning Channel Catfish
Having the right tools for the job can make a world of difference when cleaning catfish. Trying to use a dull kitchen knife will lead to frustration, potential injury, and a messier result. Investing in a few key pieces of equipment will not only make the process easier but also safer and more efficient, allowing you to get those fillets ready in no time.
The Right Knives Make All the Difference
You'll want at least one good, sharp fillet knife. For catfish, a slightly stiffer blade can sometimes be helpful due to their tough skin and bone structure, but a flexible blade is still crucial for separating meat from bone. An electric fillet knife can be an absolute game-changer, especially if you're cleaning multiple fish or larger ones. It slices through skin and bone effortlessly, saving your hands a lot of work. Many anglers find great options for both manual and electric fillet knives on platforms like Amazon. I personally prefer an electric knife for the initial skinning, then switch to a traditional fillet knife for fine-tuning the fillets. You might want to check out articles like Best Fillet Knife for Walleye as many of those recommendations work well for catfish too.
Here's a quick comparison of knife types:
| Knife Type | Pros | Cons | Ideal For |
|---|---|---|---|
| Manual Fillet Knife | Precision, control, no power needed | Can be tiring on many fish, requires good technique | Smaller fish, detailed trimming, delicate work |
| Electric Fillet Knife | Speed, power, less effort, great for tough skin | Less precision for intricate cuts, needs power | Larger fish, high volume cleaning, quick skinning |
Protecting Yourself and Your Workspace
Catfish are notoriously slippery, even after they've been dispatched. A good pair of gripping gloves can prevent slips and nicks. Many people use specialized fish cleaning gloves or even tough work gloves. Also, a sturdy cleaning surface is key. A dedicated cleaning board with a clamp to hold the fish's tail is invaluable. It keeps the fish from sliding around and provides a stable platform for your work. You'll also need a couple of large bowls or buckets: one for the cleaned fillets (filled with ice water is best) and one for the scraps. A hose with running water nearby is also a huge plus for rinsing fish and keeping your area clean. When you're done, having a robust cooler like those found on Amazon helps transport your fillets and keep them fresh. It's important to keep your workspace clean to prevent the spread of Aquatic Nuisance Species Rules for Boaters to other bodies of water, even when just dealing with fish parts.
Step-by-Step Guide to Cleaning Your Channel Catfish
Alright, let's get down to business! Before you start, ensure your fish is properly dispatched and has bled out. This makes for cleaner, better-tasting meat. Many anglers immediately place their catch on ice to keep the meat firm and fresh until cleaning time. For those fishing the Red River, where Red River Catfish Fishing Spots in North Dakota are abundant, you might come back with quite a haul, so having your station ready is key. Remember, How Many Catfish Can You Keep in North Dakota? limits apply, so always know your daily bag limits before you head out.
Method 1: The Skin-On Fillet (Great for Larger Fish)
While most prefer to remove the skin, for very large channel catfish, some anglers opt for a skin-on method, especially if they plan to grill or smoke the fish, as the skin can help keep the fillet together. However, even with this method, you'll still be removing much of the tough outer layer.
- Secure the Fish: Lay the fish on your cleaning board. If you have a clamping board, secure the tail.
- Make the Initial Cut: Starting just behind the pectoral fin (the one on the side, near the head), make a deep cut straight down behind the gill plate, all the way to the backbone. Do not cut through the backbone.
- Cut Along the Top: Turn your knife and run it along the top of the backbone, from your initial cut all the way to the tail. Keep the blade tight against the bone, trying to get as much meat as possible.
- Cut Along the Bottom: Now, make a shallow cut from the initial cut, along the belly to the tail, staying above the gut cavity.
- Remove the Fillet: Using short, sawing motions, work your knife to separate the fillet from the rib bones. Once past the ribs, you can continue the cut along the belly to fully detach the fillet from the fish. If you prefer to keep the skin on, you're essentially done with this side. You'll have a skin-on fillet, which you can then trim further. Repeat on the other side.
- Trimming (Optional for Skin-On): Even with skin on, you'll want to trim away any dark meat, fat, and any remaining small bones around the belly cavity.
Method 2: The Skin-Off Fillet (For a Cleaner Finish)
This is the most common and recommended method for channel catfish, as it results in clean, boneless, and skinless fillets. This method is often preferred by home cooks who want to bread and fry their catch, offering a delightful texture without the chewiness of the skin. If you've just brought in a few from Missouri River Fishing Guide or Devils Lake Fishing Guide, this is likely the method you'll employ.
- Prepare for Skinning: Just like Method 1, lay the fish on your cleaning board and make the initial deep cut behind the gill plate, down to the backbone, but not through it.
- Cut Along the Top and Bottom: Make your cuts along the top of the backbone and along the belly, separating the fillet from the main body, similar to Method 1, leaving the fillet still attached to the tail section by the skin. This partial separation makes the next step easier.
- Skinning the Fillet: This is where the magic happens. Grab the tail end of the fillet firmly. With your other hand, hold your fillet knife at a very shallow angle (almost flat) against the skin, where the fillet is still attached near the tail. Wiggle the knife back and forth, pulling the skin away from the blade rather than pushing the blade through the skin. This might take a few tries to get the hang of it, but once you do, the fillet will separate cleanly from the skin, leaving a beautiful, skinless piece of meat. Many anglers find an electric knife makes this part incredibly quick and easy.
- Repeat and Trim: Flip the fish over and repeat the process for the second fillet. Once both fillets are off, you can trim any remaining dark meat, fat, or stray bones. Look for the "mud line" or "blood line" along the lateral line – removing this dark strip can further enhance the flavor.
Quick Gutting for Pan-Frying Whole
Sometimes, especially with smaller channel catfish (often called "pan-sized"), you might prefer to clean them whole to fry or grill them with the bones in, eating around them. This is a much quicker process than filleting. This method leaves the head on for presentation or removes it if preferred.
- Remove Head (Optional): If you want to remove the head, make a deep cut behind the gill plate and pectoral fins, cutting all the way through the backbone.
- Gutting: Make a shallow cut along the belly, from the vent (the anal opening) up to the gill plate (or where the head used to be). Be careful not to puncture the intestines.
- Scoop Out Guts: Using your fingers or a spoon, scoop out all the internal organs. Make sure to scrape out the kidney line (a dark red line along the backbone) as well, as this can impart a bitter flavor.
- Rinse Thoroughly: Rinse the inside cavity and the entire fish under cold running water until clean.
- Skinning (Optional for Whole Fish): You can still skin a whole catfish for pan-frying if desired. After gutting, you can use pliers or a specialized skinning tool. Start near the head or dorsal fin, make a small cut to grab the skin, and then pull it off with pliers. It comes off in strips. This is a bit messier but effective.
Post-Cleaning Care and Storage
Once you've got those beautiful fillets, the work isn't quite done. Proper care and storage are crucial to maintaining the quality and freshness of your catch. You've put in the effort to clean them; now ensure they taste amazing when you're ready to cook. This final stage is as important as the cleaning itself, preventing freezer burn and keeping that fresh-caught flavor locked in.
Rinsing, Drying, and Packaging for Freshness
Immediately after filleting, rinse your catfish thoroughly in cold water to remove any remaining blood or small bits of bone. Pat the fillets dry with paper towels. Excess moisture is the enemy of good freezing and can lead to a mushy texture.
For short-term storage (1-2 days), place the dried fillets in a single layer on a plate or in a container, cover them, and place them on ice in your refrigerator.
For longer-term storage, proper packaging is key. Here are a few options:
- Vacuum Sealing: This is hands-down the best method. Vacuum sealers remove all air, preventing freezer burn and extending the shelf life of your fillets for many months. You can find excellent vacuum sealers and bags on Amazon.
- Water Bath/Freezer Bags: If you don't have a vacuum sealer, place fillets in freezer-safe bags, fill the bag with water until the fillets are submerged, and then squeeze out as much air as possible before sealing. The water creates an ice block that protects the fish from air.
- Plastic Wrap and Foil: Wrap individual fillets tightly in plastic wrap, then wrap them again tightly in heavy-duty aluminum foil. This double layer helps protect against air exposure.
Always label your packages with the date to ensure you use the oldest fish first. For general information on maintaining your catch, you might find Best Coolers for Keeping Fish Fresh useful.
Freezing for Long-Term Enjoyment
Freezing your properly packaged channel catfish fillets will allow you to enjoy your harvest for months to come. When you're ready to cook, thaw the fillets slowly in the refrigerator overnight. Avoid thawing at room temperature, as this can degrade the quality of the meat. Once thawed, pat them dry again and cook as desired.
The average shelf life for properly frozen and vacuum-sealed catfish fillets is typically 6-12 months, though some claim even longer. If using the water bath method, expect 3-6 months. The plastic wrap and foil method is usually good for 2-4 months. The key is to minimize air exposure and maintain a consistent freezer temperature. This way, you can relive those fantastic North Dakota Channel Catfish Fishing Guide trips well into the colder months!
Disclaimer
This article is for general informational purposes only and does not constitute professional advice. Laws, prices and regulations vary by location and change over time. Consult a qualified professional for guidance on your specific situation.